Post by imperfectgolfer on Jul 27, 2017 11:24:33 GMT -5
In my last post, I mentioned that Dan Carraher harbors the wrongheaded opinion that there is no such thing as a "no-roll DH-hand release action" that can keep the clubface square to the clubhead arc during the clubhead's travel time through the immediate impact zone between P7 and P7.2. I will now demonstrate that he is totally wrong by using a golfer (Jordan Spieth) who prototypically uses a no-roll DH-hand release action that causes the clubface to remain square to the clubhead arc between P7 and P7.2 (and often to well beyond P7.4).
Here is a DTL swing video of Jordan Spieth's driver swing.
Here are capture images of his followthrough.
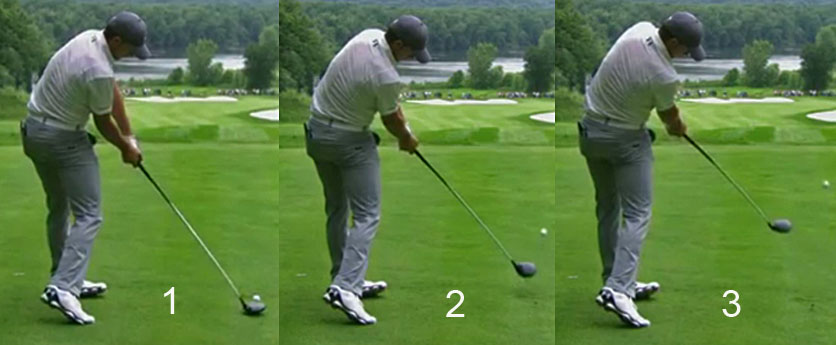
Image 1 is at impact (P7), image 2 is at P7.2 and image 3 is at P7.4.
Note that the clubface is square to the clubhead arc between P7 and P7.4, which defines Jordan Spieth as being a DHer.
Here is another DTL swing video of Jordan Spieth hitting a short iron.
Here are capture images of his followthrough.
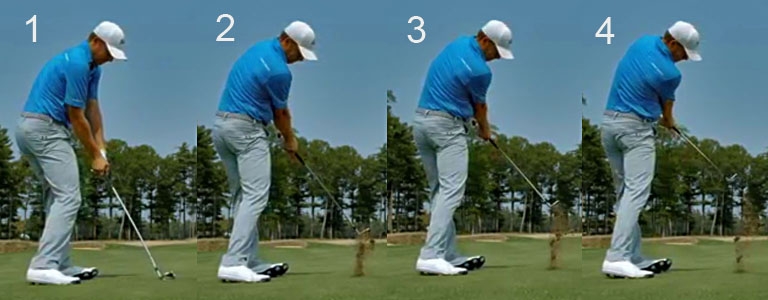
Image 1 is at impact, image 2 is at P7.2, image 3 is at P7.4, and image 4 is at P7.6.
Note that Jordan Spieth is such a good DHer that he keeps his clubface square to the clubhead arc to well beyond the end of the immediate impact zone (which ends at P7.2) and that he even has a square clubface relative to the clubhead arc at P7.6.
Here is a face-on swing video of Jordan Spieth's driver swing.
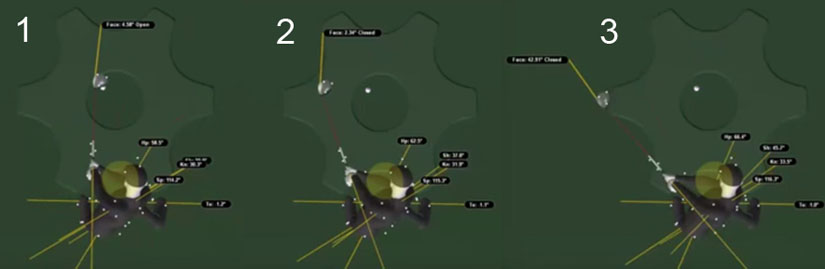
Here are capture images of his followthrough.
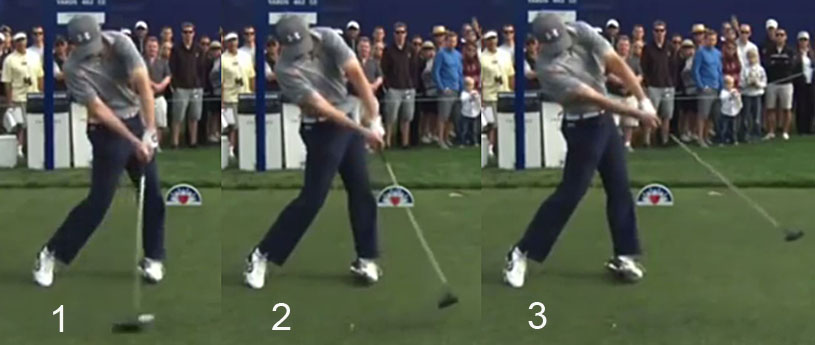
Image 1 is at impact, image 2 is at P7.2 and image 3 is at P7.6.
Note that he keeps the clubface square to the clubhead arc during his followthrough to P7.2, and even more amazingly to P7.6+.
Jordan Spieth uses a no-roll subtype of DH-hand release action, and not a delayed full-roll subtype of DH-hand release action.
Note that the clubshaft does not bypass his left arm, which is an useful clue that a golfer is a DHer who is avoiding a significant amount of "left wrist extending" (arbitrarily defined as being >5 degrees between P7 and P7.2) and/or any significant amount of left forearm supination. He is only rolling the clubface by the amount needed to keep the clubface square to the clubhead arc - via biomechanical motions happening at the level of his left shoulder complex (and they include the inside-left 3-D motion of his left shoulder socket +/- a small amount of external rotation of the left humerus in the left shoulder socket).
I don't have access to a 3-D graph of Jordan Spieth's swing, but according to Dan Carraher he has 6 degrees of left wrist flexion at impact and 11 degrees of left wrist extension at P8. I strongly suspect that most of the "left wrist extending" phenomenon happens between P7.6 and P8, but even if it actually happens uniformly between P7 and P8 that means that his left wrist is only extending ~1.8 degrees for every 10 degrees of clubshaft angulation between P7 and P8. That means that there is only 3.6 degrees of "left wrist extending" happening between P7 and P7.2 (which is well below my arbitrary threshold of 5 degrees) and that allows Jordan Spieth to be a DHer who has such a low ROC of his clubface through impact that he can keep the clubface square to his clubhead arc between P7 and P7.2.
Now consider the golf swing of another DHer - Jon Rahm.
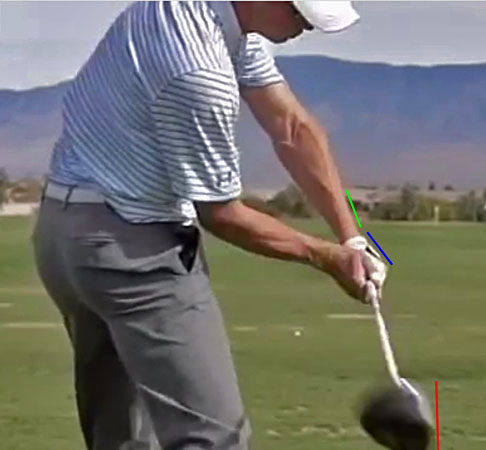
Jon Rahm's driver swing (face-on view).
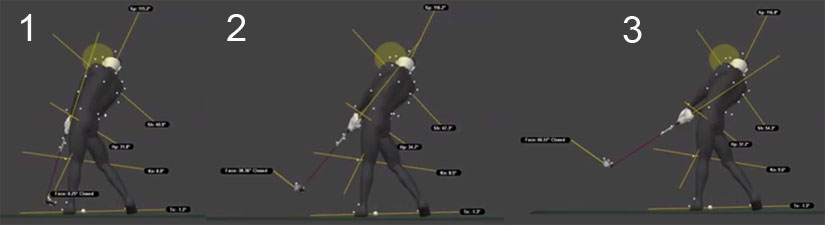
Here are capture images of his followthrough.
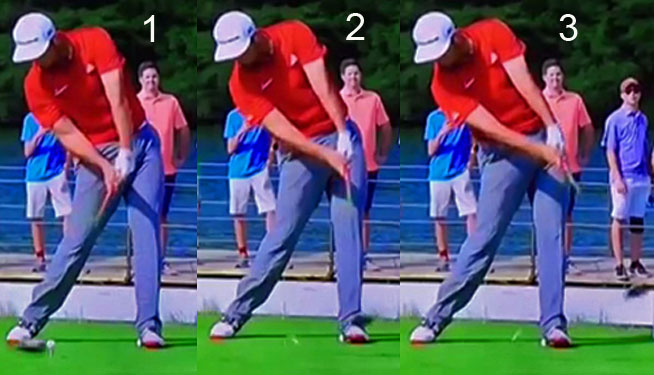
Image 1 is impact, image 2 is at P7.2 and image 3 is at P7.4.
Note that Jon Rahm is a DHer who keeps his clubface square to the clubhead arc between P7 and P7.2+ and that his clubshaft does not bypass his left arm (which is an useful clue that a golfer is a DHer).
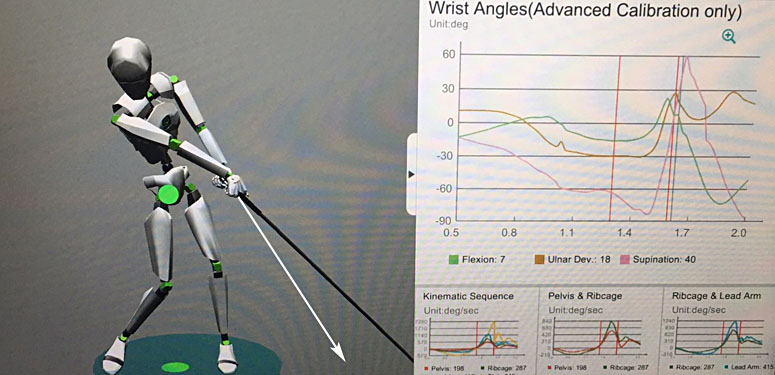
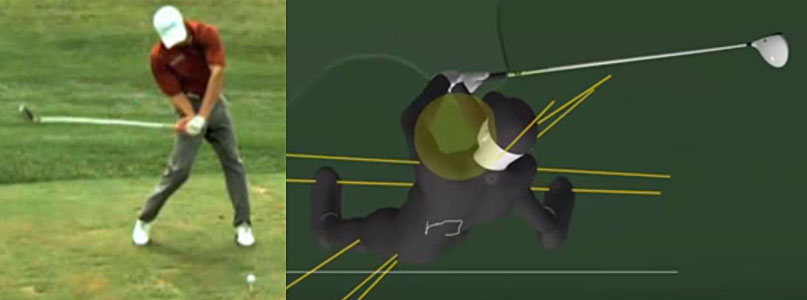
Interestingly, I managed to discover a 3-D graph of Jon Rahm's left wrist flexion-extension in the following video.
In that video, Dr. Rose and Dave Philips discuss Jon Rahm's kinematic sequence using 3-D graphs. However, I noticed that there was a 3D graph of his left forearm/wrist motion in the background (although they never discussed that particular graph).
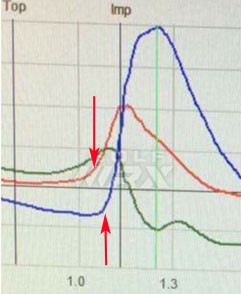
Here is a copy of Jon Rahm's 3-D graph that I captured from the above video.
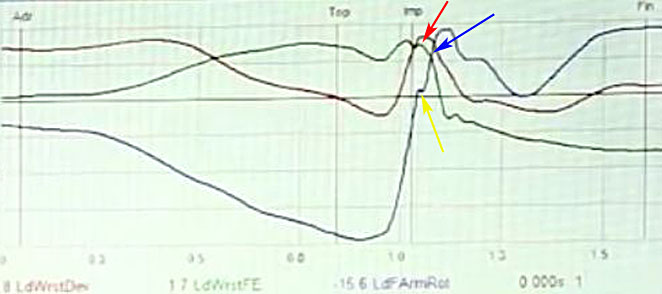
The green graph is his left wrist flexion-extension graph. Note that his left wrist is flexed at his P4 position (labelled top). Note that his left wrist becomes slightly less flexed during his early-mid downswing and that it then becomes increasingly flexed in his later downswing to reach its peak degree of flexion just before impact, before becoming very slightly less flexed by impact (although the degree of change in the direction of "left wrist extending" is very small just before impact). Note that his left wrist remains flexed to approximately the same degree between P7 and P7.2 and that it doesn't significantly extend during that time period - see the red arrow pointing at a plateau of the green graph that happens immediately post-impact. Note also that there is very little "left wrist extending" happening between the red arrow and the blue arrow and that the left wrist only starts to extend rapidly/massively after the blue arrow. I don't exactly know where that blue arrow time point is located, but it is probably well beyond P7.4.
The blue graph is Jon Rahm's supination-pronation graph. Note that his left forearm moves from pronation in the direction of supination very fast during his later downswing and this represents the release of PA#3. Jon Rahm uses a weak left hand grip, so he obviously needs to use a PA#3 in order to get a square clubface by impact. Note that his left forearm is minimally pronated at impact (and very close to neutral) and that there is a minimal amount of left forearm supination happening between P7 and P7.2 - see yellow arrow pointing at a plateau of the blue graph.
This 3-D graph, which demonstrates that there is very little "left wrist extending" and/or left forearm supination happening between P7 and P7.2, is highly compatible with Jon Rahm's 2-D images - and they explain why Jon Rahm is such a good DHer who can keep his clubface square to the clubhead arc throughout the clubhead's travel time through the immediate impact zone between P7 and P7.2, and who can prevent the clubshaft from bypassing his left arm during that time period.
Jon Rahm's golf swing action (and the supporting "evidence" from a 3-D graph) demonstrates the "fact" that all pro golfers (other than Daniel Berger) do not rapidly and massively extend their left wrist through impact (as Dan Carraher and Fort Worth Pro have repeatedly, and wrongly, asserted in the GolfWRX forum).
To those open-minded golfers who do not have their "heads stuck in the sand like an ostrich" - a metaphor that best exemplifies the mental bindness exhibited by many GolfWRX forum members like bph7 and Bronson - they can learn about the core differences between a DH-hand release action versus a non-DH hand release action in the following short review paper ( perfectgolfswingreview.net/VP9.html ) and they can learn very much more about the biomechanics of a DH-hand release action if they start watching the following video starting at the 21:56 minute time point.
Jeff.
Here is a DTL swing video of Jordan Spieth's driver swing.
Here are capture images of his followthrough.
Image 1 is at impact (P7), image 2 is at P7.2 and image 3 is at P7.4.
Note that the clubface is square to the clubhead arc between P7 and P7.4, which defines Jordan Spieth as being a DHer.
Here is another DTL swing video of Jordan Spieth hitting a short iron.
Here are capture images of his followthrough.
Image 1 is at impact, image 2 is at P7.2, image 3 is at P7.4, and image 4 is at P7.6.
Note that Jordan Spieth is such a good DHer that he keeps his clubface square to the clubhead arc to well beyond the end of the immediate impact zone (which ends at P7.2) and that he even has a square clubface relative to the clubhead arc at P7.6.
Here is a face-on swing video of Jordan Spieth's driver swing.
Here are capture images of his followthrough.
Image 1 is at impact, image 2 is at P7.2 and image 3 is at P7.6.
Note that he keeps the clubface square to the clubhead arc during his followthrough to P7.2, and even more amazingly to P7.6+.
Jordan Spieth uses a no-roll subtype of DH-hand release action, and not a delayed full-roll subtype of DH-hand release action.
Note that the clubshaft does not bypass his left arm, which is an useful clue that a golfer is a DHer who is avoiding a significant amount of "left wrist extending" (arbitrarily defined as being >5 degrees between P7 and P7.2) and/or any significant amount of left forearm supination. He is only rolling the clubface by the amount needed to keep the clubface square to the clubhead arc - via biomechanical motions happening at the level of his left shoulder complex (and they include the inside-left 3-D motion of his left shoulder socket +/- a small amount of external rotation of the left humerus in the left shoulder socket).
I don't have access to a 3-D graph of Jordan Spieth's swing, but according to Dan Carraher he has 6 degrees of left wrist flexion at impact and 11 degrees of left wrist extension at P8. I strongly suspect that most of the "left wrist extending" phenomenon happens between P7.6 and P8, but even if it actually happens uniformly between P7 and P8 that means that his left wrist is only extending ~1.8 degrees for every 10 degrees of clubshaft angulation between P7 and P8. That means that there is only 3.6 degrees of "left wrist extending" happening between P7 and P7.2 (which is well below my arbitrary threshold of 5 degrees) and that allows Jordan Spieth to be a DHer who has such a low ROC of his clubface through impact that he can keep the clubface square to his clubhead arc between P7 and P7.2.
Now consider the golf swing of another DHer - Jon Rahm.
Jon Rahm's driver swing (face-on view).
Here are capture images of his followthrough.
Image 1 is impact, image 2 is at P7.2 and image 3 is at P7.4.
Note that Jon Rahm is a DHer who keeps his clubface square to the clubhead arc between P7 and P7.2+ and that his clubshaft does not bypass his left arm (which is an useful clue that a golfer is a DHer).
Interestingly, I managed to discover a 3-D graph of Jon Rahm's left wrist flexion-extension in the following video.
In that video, Dr. Rose and Dave Philips discuss Jon Rahm's kinematic sequence using 3-D graphs. However, I noticed that there was a 3D graph of his left forearm/wrist motion in the background (although they never discussed that particular graph).
Here is a copy of Jon Rahm's 3-D graph that I captured from the above video.
The green graph is his left wrist flexion-extension graph. Note that his left wrist is flexed at his P4 position (labelled top). Note that his left wrist becomes slightly less flexed during his early-mid downswing and that it then becomes increasingly flexed in his later downswing to reach its peak degree of flexion just before impact, before becoming very slightly less flexed by impact (although the degree of change in the direction of "left wrist extending" is very small just before impact). Note that his left wrist remains flexed to approximately the same degree between P7 and P7.2 and that it doesn't significantly extend during that time period - see the red arrow pointing at a plateau of the green graph that happens immediately post-impact. Note also that there is very little "left wrist extending" happening between the red arrow and the blue arrow and that the left wrist only starts to extend rapidly/massively after the blue arrow. I don't exactly know where that blue arrow time point is located, but it is probably well beyond P7.4.
The blue graph is Jon Rahm's supination-pronation graph. Note that his left forearm moves from pronation in the direction of supination very fast during his later downswing and this represents the release of PA#3. Jon Rahm uses a weak left hand grip, so he obviously needs to use a PA#3 in order to get a square clubface by impact. Note that his left forearm is minimally pronated at impact (and very close to neutral) and that there is a minimal amount of left forearm supination happening between P7 and P7.2 - see yellow arrow pointing at a plateau of the blue graph.
This 3-D graph, which demonstrates that there is very little "left wrist extending" and/or left forearm supination happening between P7 and P7.2, is highly compatible with Jon Rahm's 2-D images - and they explain why Jon Rahm is such a good DHer who can keep his clubface square to the clubhead arc throughout the clubhead's travel time through the immediate impact zone between P7 and P7.2, and who can prevent the clubshaft from bypassing his left arm during that time period.
Jon Rahm's golf swing action (and the supporting "evidence" from a 3-D graph) demonstrates the "fact" that all pro golfers (other than Daniel Berger) do not rapidly and massively extend their left wrist through impact (as Dan Carraher and Fort Worth Pro have repeatedly, and wrongly, asserted in the GolfWRX forum).
To those open-minded golfers who do not have their "heads stuck in the sand like an ostrich" - a metaphor that best exemplifies the mental bindness exhibited by many GolfWRX forum members like bph7 and Bronson - they can learn about the core differences between a DH-hand release action versus a non-DH hand release action in the following short review paper ( perfectgolfswingreview.net/VP9.html ) and they can learn very much more about the biomechanics of a DH-hand release action if they start watching the following video starting at the 21:56 minute time point.
Jeff.