Post by imperfectgolfer on Feb 27, 2024 18:14:15 GMT -5
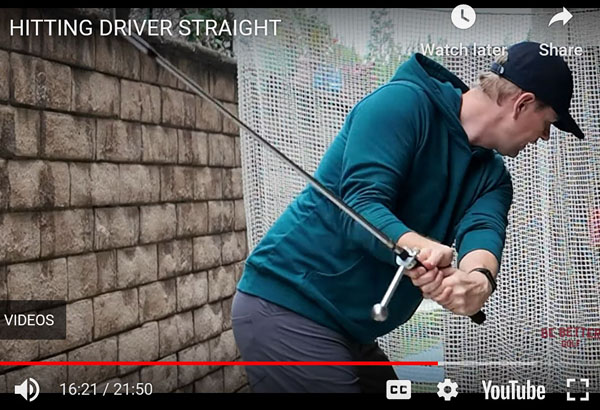
Watch BD's latest video on how to hit the driver straight.
BD states that he has been instructed by >60 golf instructors and that for this golf instructional video that he is distilling the most important golf instructional elements needed to hit the ball straight when hitting a driver.
He starts off by stating that a golfer should move the clubshaft on the functional swingplane between P6 => P8 where the clubshaft must be parallel to the ball-target line at P6 and P8. I agree with BD's opinion, but BD does not explain why this is important. I believe that the true purpose for following that advice is to create a clubhead path that is in-to-square-to-in relative to the ball-target line - as demonstrated in the following image.
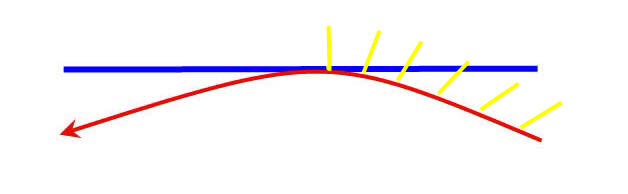
The blue line represents the ball-target line, the curved red line represents the clubhead path and the short yellow line represents the clubface angle.
Note that when the clubhead path touches the ball-target line, it is square to the target. Then, if the timing of the clubhead release action is perfected so that the clubhead is facing the target at impact (= zeroing-out the clubhead path at impact) then one has solved the first problem of controlling both the clubhead path and the timing of the clubhead's motion along the clubhead path so that it is square to the target at impact. BD does not discuss in this video how to ensure that the release of the club (= release of PA#2) is perfected to ensure that the clubhead is at the correct position along the clubhead path so that the clubhead path is zeroed-out at impact.
BD also did not discuss how a developing golfer should learn how to keep the clubshaft moving along the functional swingplane between P6 => P8 so that he can create that symmetrical in-to-square-to-in clubhead path.
The best answer to that problem-issue is to learn how to swing the clubshaft on-plane as described in topic number 7 of my downswing chapter at perfectgolfswingreview.net/downswing.htm#topic7
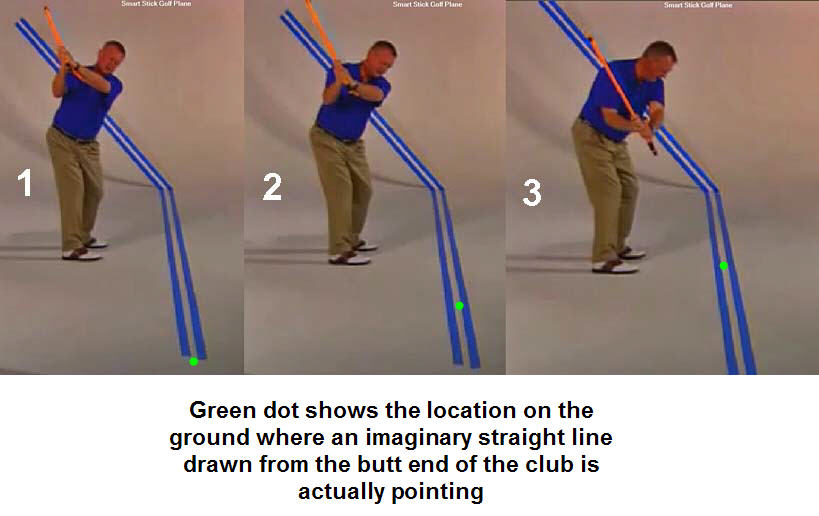
Here is an image of Martin Hall using a Smartstick (which has laser lights at each end of the Smartstick) to trace a straight plane line (SPL) where the SPL is the ball-target line.
I would highly recommend that a developing golfer watch the following two Martin Hall videos if he wants to understand how learning to trace the SPL (= ball-target line) is the best way to learn how to keep the clubshaft continuously on-plane on the FSP between P6 => P8.
Video 1:
Video 2:
If a developing golfer can keep his clubshaft on-plane between P6 => P8 so that he can create an in-to-in clubhead path that is symmetrical relative to the ball-target line and where the clubhead's motion along the clubhead path is perfectly timed so that it is square to the target at impact, then he has successfully learned how to zero-out his clubhead path by impact.
To hit the ball straight with his driver, he also has to learn how to zero-out the clubface at impact so that it is square to both the clubhead path and the target at impact if he wants to hit the ball straight. BD gives totally wrongheaded advice on how to accomplish that goal.
BD states that the problem of clubface control is due to the fact that the clubhead is offset relative to the clubshaft and he recommends that a golfer learn how to use the reverse motorcycle move to close the clubface relative to the clubhead path by P6. BD is totally wrong about those two facts!!!
The primary reason why the clubface is not square to the clubhead path by P4, where it has rotated ~90 degrees open relative to the clubhead path if a golfer adopts a neutral lead hand grip, is the fact that the golfer is biomechanically obliged to perform a lead forearm pronatory action between P1 => P4. If a golfer did not need to perform a lead forearm pronatory motion between P1 => P4, which is nearly possible from a biomechanical perspective if the golfer adopts an ultra-strong lead hand grip at address, then the problem of having an open clubface at P4 would not exist. Because most golfers (who use a weak-or-neutral-or moderately strong lead hand grip) have an open clubface at P4, there is an obligatory/mandatory fact that he will need to perform a lead forearm supinatory motion to close the clubface during the later downswing between P5.5 => P7. Using a reverse motorcycle maneuver (as recommended by BD) will not alter this bold-highlighted reality - and I will donate 1 million dollars to BD's BBG-school if he can prove me wrong.
BD will never understand the problem-issue of clubface control if he never understands why all pro golfers perform a PA#3 release action (which is biomechanically due to lead forearm supination) between P5.5 => P7.
The amount of lead forearm supination required is inversely proportional to lead hand grip strength.
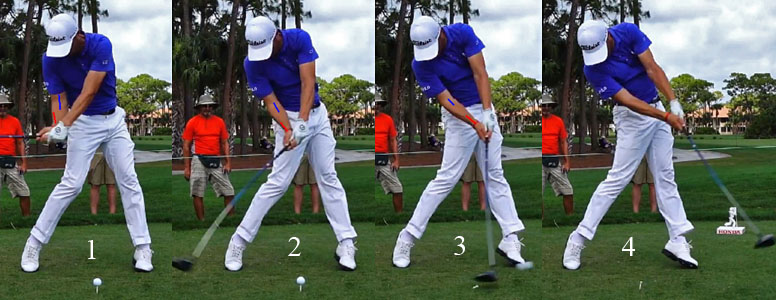
Consider the PA#3 release action of Justin Thomas who uses a weak lead hand grip strength.
Note that the back of JT's lead hand is facing the ball-target line at P6 (image 1) and then facing the target at impact (impact 3) due mainly to a counterclockwise rotation of his lead hand that is biomechanically primarily due to lead forearm supination.
Using the reverse motorcycle move does not alter this reality.
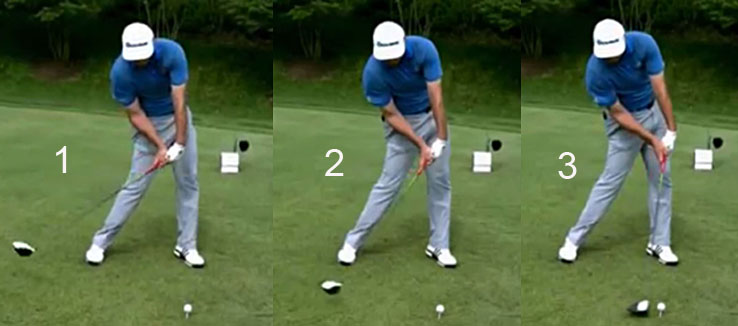
Jon Rahm, who also adopts a weak lead hand grip strength at address, uses the reverse motorcycle move between P4 => P6, but he still has to use a lot of lead forearm supination between P6 => P7 in order to square his clubface relative to his clubhead path by impact.
Capture images of Jon Rahm's PA#3 release action.
Image 1 is at P6.5 and image 3 is at impact.
Note that JR's clubface is open relative to his clubhead path at P6.5 even though he used the reverse motorcycle move between P4 => P6. Note how much JR rotates his lead lower forearm's radial bone (and the glove logo on the back of his lead hand) counterclockwise between P6.5 => P7 - which is biomechanically due to a lead forearm supinatory motion - and it is a mandatory/non-negotiable requirement if he wants to square his clubface relative to his clubhead path (and target) by P7.
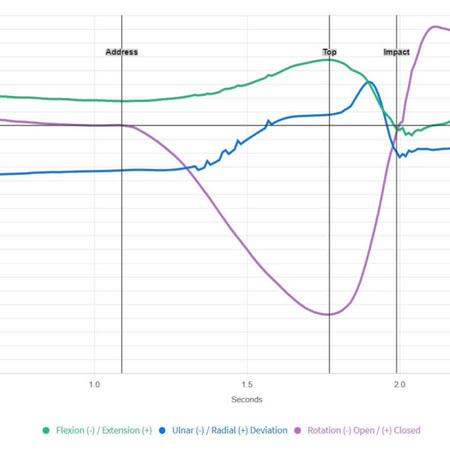
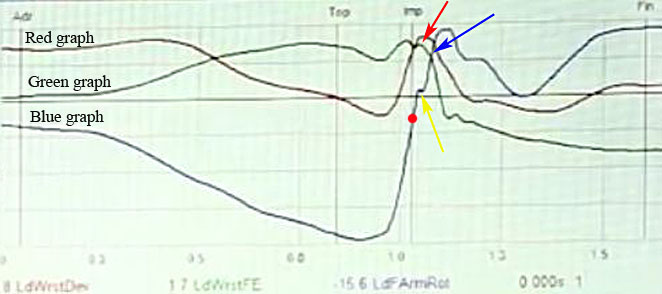
Here is Jon Rahm's lead forearm supination graph obtained by a TPI 3D-motion capture system.
The blue graph is his lead forearm supination graph. Note that the nadir of the graph is at P6 and note how much, and how rapidly, he has to supinate his lead forearm between P6 => P7 (red dot) in order to get his clubface square to the clubhead path, and therefore also the target, at impact.
Until BD understands this fact, he will never understand the golf biomechanics underlying the issue of clubface control that is needed to hit a driver straight.
Jeff.