Post by imperfectgolfer on Jan 25, 2023 11:19:54 GMT -5
In this thread I am going to analyse in great depth the opinions expressed by Scott Cowx (SC) in the following video.
I will briefly describe in narrative prose a summary of some of the opinions expressed by SC in that video. I will then subsequently analyse, and critique, his opinions in part 2 in great detail.
In his video SC describes the body/arm orientation movements that a golfer should use to support the particular wrist motion pattern that he uses.
SC states that 95% of pro golfers optionally use either one of the following two wrist motion patterns.


Part 1:
I will briefly describe in narrative prose a summary of some of the opinions expressed by SC in that video. I will then subsequently analyse, and critique, his opinions in part 2 in great detail.
In his video SC describes the body/arm orientation movements that a golfer should use to support the particular wrist motion pattern that he uses.
SC states that 95% of pro golfers optionally use either one of the following two wrist motion patterns.
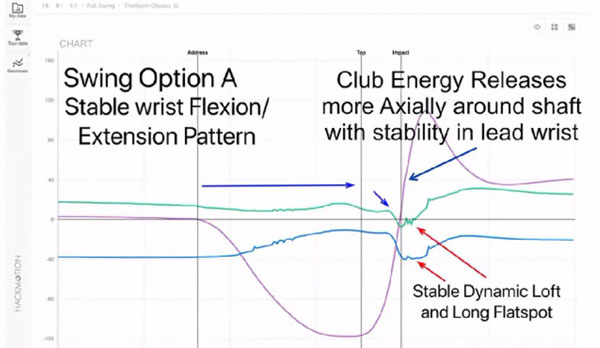
Here is the wrist option A pattern (obtained by a HackMotion device used on the pro golfer Thorbjorn Olesen).
The green graph is the lead wrist flexion (-)/extension (+) graph, the blue graph is the lead wrist radial ((+)/ulnar (-) deviation graph, and the purple graph is the rotation of the lead hand graph (which includes the effect of body and arm rotational motions).
Note that his lead wrist is extended at address and at P4. Note that his lead wrist remains extended in the early-mid downswing, and then moves towards flexion in the later downswing and it has 0-5 degrees of lead wrist flexion at impact. Then, the lead wrist remains unchanged in its degree of lead wrist flexion of approximately 0 - 5 degrees between P7 => ~P7.2 before moving rapidly towards extension.
Note that the lead wrist is ulnar-deviated at impact, and also to the same degree between P7 => ~P7.4.
The combination of a stable lead wrist flexion value of 0-5 degrees + a finite, but unchanging, amount of ulnar deviation of the lead wrist allows a golfer to maintain a stable dynamic loft and long flatspot through impact into the early followthrough.
Note that the lead hand rotates very fast through impact in a supinatory direction (+), which leads SC to conclude that the club's release energy is happening more axially around the longitudinal axis of the shaft while the lead wrist remain stable (in terms of any lead wrist hinging motions happening in the plane of lead wrist flexion => extension).
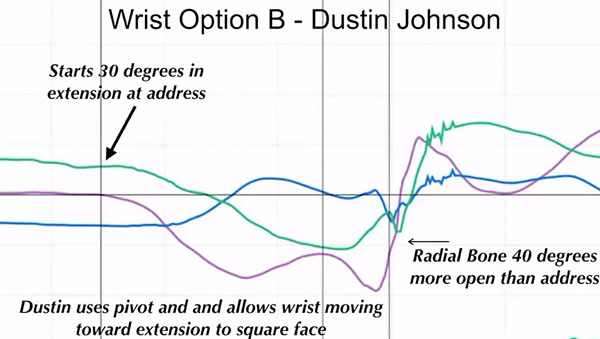
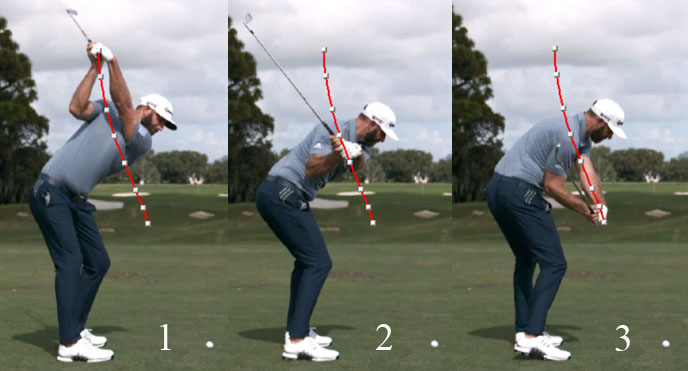
Here is the wrist option B pattern (obtained by a HackMotion device used on the pro golfer Dustin Johnson).
Note that his lead wrist is extended at address and at P4. Note that his lead wrist remains extended in the early-mid downswing, and then moves towards flexion in the later downswing and it has 0-5 degrees of lead wrist flexion at impact. Then, the lead wrist remains unchanged in its degree of lead wrist flexion of approximately 0 - 5 degrees between P7 => ~P7.2 before moving rapidly towards extension.
Note that the lead wrist is ulnar-deviated at impact, and also to the same degree between P7 => ~P7.4.
The combination of a stable lead wrist flexion value of 0-5 degrees + a finite, but unchanging, amount of ulnar deviation of the lead wrist allows a golfer to maintain a stable dynamic loft and long flatspot through impact into the early followthrough.
Note that the lead hand rotates very fast through impact in a supinatory direction (+), which leads SC to conclude that the club's release energy is happening more axially around the longitudinal axis of the shaft while the lead wrist remain stable (in terms of any lead wrist hinging motions happening in the plane of lead wrist flexion => extension).
Here is the wrist option B pattern (obtained by a HackMotion device used on the pro golfer Dustin Johnson).
The green graph is the lead wrist flexion (-)/extension (+) graph, the blue graph is the lead wrist radial ((+)/ulnar (-) deviation graph, and the purple graph is the rotation of the lead hand graph (which includes the effect of body and arm rotational motions).
Note that DJ has 30 degrees of lead wrist extension at address, and that he moves it ~70 degrees towards flexion between P1 => P4 so that it becomes overtly bowed at his P4 position. He then maintains an overtly bowed lead wrist during his early-mid downswing, but allows it to hinge towards extension in his later downswing. At impact, and immediately post-impact, his lead wrist is still slightly bowed, and it then moves rapidly towards extension in his later followthrough.
Note that DJ's lead forearm, which is pronated at P4, is moving increasingly clockwise (in the direction of more lead wrist pronation) during his clubshaft shallowing action that happens between P4 => P6. In his later downswing, it starts to move counterclockwise in a supinatory direction, but it is still pronated at impact such that the lead forearm's lower radial bone is open 40 degrees relative to its address alignment.
Note that SC has added a statement "allows the wrist moving towards extension to square face". That statement seemingly implies that a wrist option B golfer does not square the clubface in the later downswing via a PA#3 release action (which is primarily due to lead forearm supination), but that he does it by moving the lead wrist from being frankly bowed at P6 to becoming less bowed at impact.
To perform these wrist option patterns in the optimal manner, SC describes what a golfer specifically needs to do with respect to body/arm motions.
Starting with the wrist option A pattern.
SC states that a golfer should avoid radially-deviating the lead wrist too much at P4 because that would increase the degree of lead wrist extension too much at the start of the transition to the downswing.
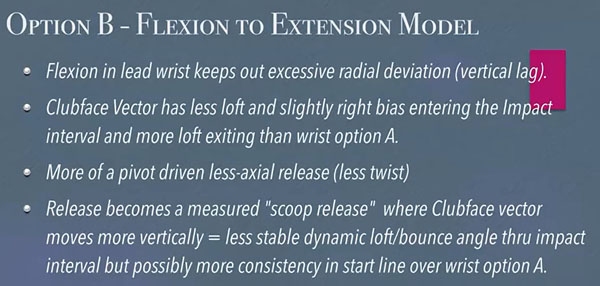
SC states that the clubface has more loft and right bias entering impact and the less loft after impact. SC uses the term "turn-down" release to describe the fact that the clubface vector moves more horizontally through impact with a stable dynamic loft.
Here is SC's description of wrist option B pattern.
SC correctly states that if the lead wrist is grossly bowed at the P4 position that it prevents the lead wrist from becoming excessively radially-deviated at the P4 position.
SC states that the clubface will approach impact with less loft (due to lead wrist bowing causing forward shaft lean), but with more loft after impact.
SC thinks of this type of wrist release pattern as being pivot-driven, with less axial release where the clubface rotates rapidly around its longitudinal axis.
SC refers to this type of release as being a measured "scoop release" because the clubface moves from being delofted at P6/P6.5 to becoming less delofted by impact as a result of the lead wrist's degree of flexion becoming progressively less between P6 => P7.
At the 9:24 minute time point of the video, SC posts photos of TO and DJ at address.
He points out a few differences, and the major difference of importance from SC's perspective is that TO's lead humerus is internally rotated at address while DJ's lead humerus is externally rotated at address.
From a P1 => P4 perspective, SC points out some differences in the following image.
From a P1 => P4 perspective, SC points out some differences in the following image.
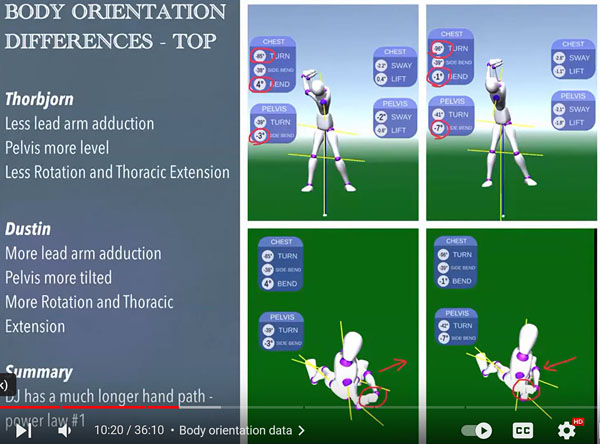
SC points out that TO has less lead arm adduction at his P4 position (which he labels a more "in front of him" swing pattern) and with a lesser degree of upper torso rotation, while DJ has more lead arm adduction and a greater degree of upper torso rotation at his P4 position.
SC then points out (starting at the 11:12 minute time point of the video) differences between the two golfers at their P5 position.
SC then points out (starting at the 11:12 minute time point of the video) differences between the two golfers at their P5 position.
SC states that TO has more thoracic flexion at P5, which he believes creates more space for the lead arm's downward motion during the early-mid downswing action.
SC states that DJ has less forward thoracic flexion at P5 with a more closed upper torso alignment and that he gets his lead arm in front of him primarily by side-bending.
At the 12:47 minute time point of the video, SC describes differences in their body/arm alignments at impact.
SC states that DJ has less forward thoracic flexion at P5 with a more closed upper torso alignment and that he gets his lead arm in front of him primarily by side-bending.
At the 12:47 minute time point of the video, SC describes differences in their body/arm alignments at impact.
SC points out that TO has 79 degrees of upper torso rotation happening between P5 => P7 with less left-lateral pelvic slide motion happening during that same time period. SC also claims that TO is slowing his pivot motion down in his later downswing in order to allow the lead humerus to move towards a greater degree of external rotation by impact, and where the lead forearm's lower radial bone will be at zero degrees of rotation at impact.
SC points out that DJ rotates his upper torso 91 degrees between P5 => P7 with more left-lateral pelvic sway motion, and SC claims that his greater degree of secondary axis tilt motion allows him to keep his lead humerus internally rotated throughout his entire downswing.
SC summarises these differences as follows-: SC states that both golfers orient their lead upper arm at impact OPPOSITE to its setup alignment. SC states that TO's lead humerus is internally rotated at address, but less internally rotated by ~30 degrees at impact, while DJ's lead humerus is externally rotated at address and internally rotated at impact.
SC states that TO is "shutting down his pivot" in his later downswing in order to allow his lead arm/forearm to passively rotate counterclockwise in order to square the clubface by impact, and he also states that DJ is driving his pivot very actively so that his lead upper arm can remain internally rotated throughout his entire downswing thereby allowing him to have a 40 degrees open alignment of his lead lower forearm's radial bone at impact.
Part 2:
I will now analyse many of SC's opinions in great depth because I disagree with many of his expressed opinions.
I am going to start off by analysing the address-and-impact alignments of the lead arm in wrist option A golfers.
Watch the SC video between the 24:30 - 25:00 minute time points of the video where SC states that a wrist option A golfer starts at address with the lead arm internally rotated, and that he then slows down his pivot motion in the later downswing to induce the lead arm/forearm to passively rotate counterclockwise (in an external rotary direction) so that when he reaches impact the lead humerus is going to be more externally rotated and the lead humerus will be straight-line-aligned with the lead lower forearm's lower radial bone and the back of the lead hand.
Here are capture images from that section of the video.
SC points out that DJ rotates his upper torso 91 degrees between P5 => P7 with more left-lateral pelvic sway motion, and SC claims that his greater degree of secondary axis tilt motion allows him to keep his lead humerus internally rotated throughout his entire downswing.
SC summarises these differences as follows-: SC states that both golfers orient their lead upper arm at impact OPPOSITE to its setup alignment. SC states that TO's lead humerus is internally rotated at address, but less internally rotated by ~30 degrees at impact, while DJ's lead humerus is externally rotated at address and internally rotated at impact.
SC states that TO is "shutting down his pivot" in his later downswing in order to allow his lead arm/forearm to passively rotate counterclockwise in order to square the clubface by impact, and he also states that DJ is driving his pivot very actively so that his lead upper arm can remain internally rotated throughout his entire downswing thereby allowing him to have a 40 degrees open alignment of his lead lower forearm's radial bone at impact.
Part 2:
I will now analyse many of SC's opinions in great depth because I disagree with many of his expressed opinions.
I am going to start off by analysing the address-and-impact alignments of the lead arm in wrist option A golfers.
Watch the SC video between the 24:30 - 25:00 minute time points of the video where SC states that a wrist option A golfer starts at address with the lead arm internally rotated, and that he then slows down his pivot motion in the later downswing to induce the lead arm/forearm to passively rotate counterclockwise (in an external rotary direction) so that when he reaches impact the lead humerus is going to be more externally rotated and the lead humerus will be straight-line-aligned with the lead lower forearm's lower radial bone and the back of the lead hand.
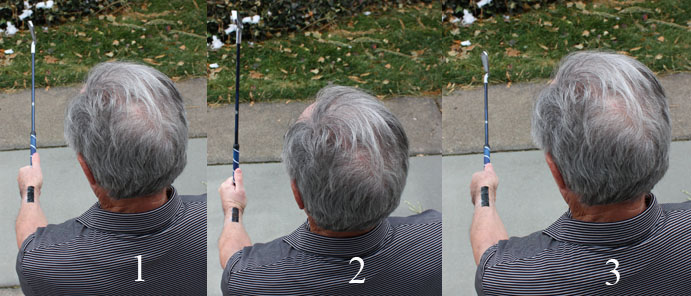
Here are capture images from that section of the video.
Image 1 shows SC demonstrating the address alignment of a wrist option A golfer where the lead humerus is internally rotated and where the lead forearm is pronated to a degree that causes the lead lower forearm's lower radial bone to be rotated to the right thereby producing the equivalant alignment of a moderately strong lead hand grip strength alignment. Note that it causes the lead wrist to be bent if the lead hand is aligned as if it were holding a clubshaft that is going to be roughly perpendicularly aligned relative to the ball-target line at address.
Image 2 shows SC demonstrating what he envisages starts to happen in the later downswing as a result of the pivot-slowing motion - the lead humerus starts to rotate externally, and the lead lower forearm rotates counterclockwise in a supinatory direction, thereby causing the lead wrist to move towards a bowed alignment as a result of the lower radial bone (at wrist crease level - watchband level) rotating towards the target.
Image 3 shows SC's "idea" of a wrist option A golfer's impact alignment. Note that the lead humerus is more externally rotated so that the lead antecubital fossa (see short red line) is facing the ball-target line (and also the face-on camera) and where it is also straight-line-aligned with the lead lower forearm's lower radial bone (see short red line) and the back of the slightly bowed lead wrist. Note that the watchface area of his lead lower forearm and the back of his lead wrist/hand is facing the target.
By contrast, image 4 shows SC demonstrating a wrist option B golfer's impact alignment where the lead humerus is internally rotated, and where the lead lower forearm's lower radial bone (short red line) is oriented 45 degrees to the right.
Does image 3 represent reality in pro golfers who use the wrist option A pattern?
Let's consider the evidence.
Here is Thorbjorn Olesen's driver swing video.
Image 2 shows SC demonstrating what he envisages starts to happen in the later downswing as a result of the pivot-slowing motion - the lead humerus starts to rotate externally, and the lead lower forearm rotates counterclockwise in a supinatory direction, thereby causing the lead wrist to move towards a bowed alignment as a result of the lower radial bone (at wrist crease level - watchband level) rotating towards the target.
Image 3 shows SC's "idea" of a wrist option A golfer's impact alignment. Note that the lead humerus is more externally rotated so that the lead antecubital fossa (see short red line) is facing the ball-target line (and also the face-on camera) and where it is also straight-line-aligned with the lead lower forearm's lower radial bone (see short red line) and the back of the slightly bowed lead wrist. Note that the watchface area of his lead lower forearm and the back of his lead wrist/hand is facing the target.
By contrast, image 4 shows SC demonstrating a wrist option B golfer's impact alignment where the lead humerus is internally rotated, and where the lead lower forearm's lower radial bone (short red line) is oriented 45 degrees to the right.
Does image 3 represent reality in pro golfers who use the wrist option A pattern?
Let's consider the evidence.
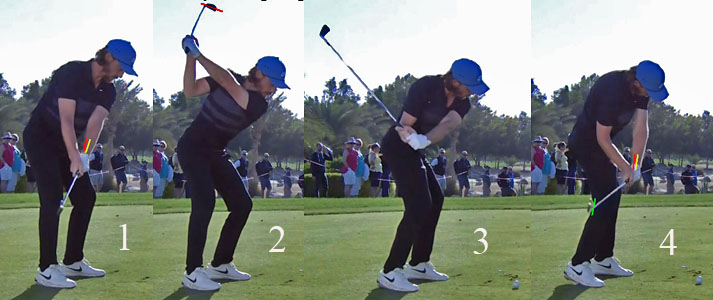
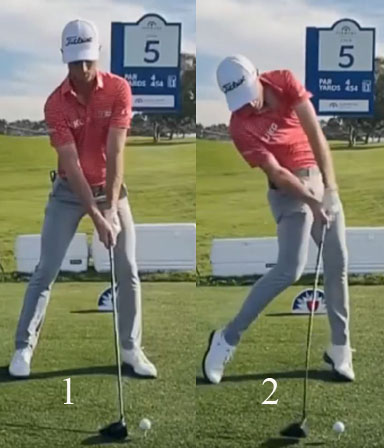
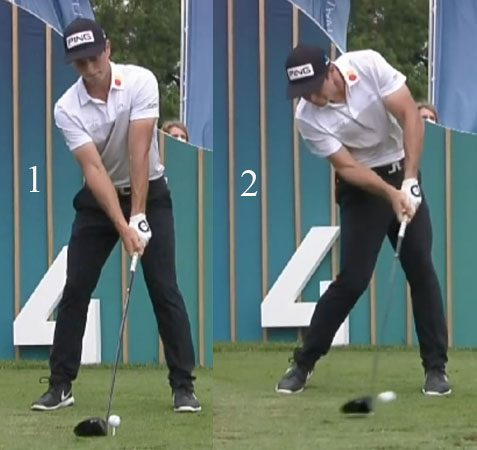
Here is Thorbjorn Olesen's driver swing video.
Here are capture images from that video showing his address (image 1) and impact (image 2) alignments.
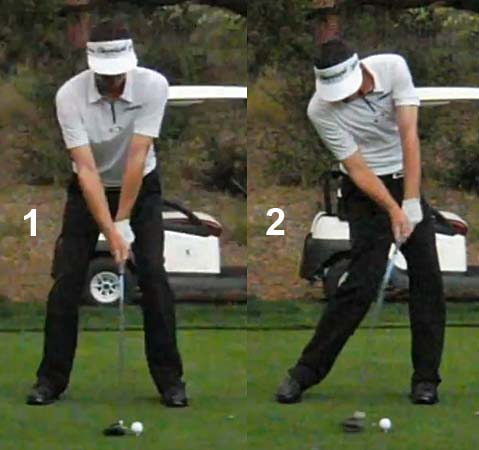
Note in image 1 that TO's lead humerus is internally rotated and note that his lead forearm is pronated so that his lead lower forearm's lower radial bone is oriented about 45 degrees to the right to the right allowing him to adopt a moderately strong (3-knuckle) lead hand grip strength at address.
Note in image 2 that his lead humerus is still internally rotated to roughly the same degree (compared to address) and that his lead lower forearm's lower radial bone is oriented to the right to the same degree as it was at address. Note that his lead wrist is flat - remember that his HackMotion graph shows that he has 0-5 degrees of lead wrist flexion at impact - but note that the back of his lead hand and the watchface area of his lead lower forearm is facing more towards the ball-target line and it is not facing the target (as seen in those SC-demo capture images just above - see image 3). Note that his clubshaft and the lead lower forearm's lower radial bone are straight-line-aligned (which means that he has an intact LFFW alignment at impact).
So, what is happening in reality in Thorbjorn Olesen's "real life" driver golf swing action is totally opposite to what SC claims is happening.
Let's consider the address-impact alignments of other pro golfers who use the wrist option A pattern.
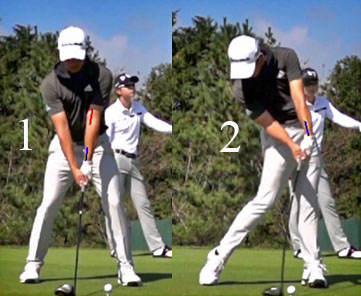
Keegan Bradley - image 1 is at address and image 2 is at impact.
Note in image 2 that his lead humerus is still internally rotated to roughly the same degree (compared to address) and that his lead lower forearm's lower radial bone is oriented to the right to the same degree as it was at address. Note that his lead wrist is flat - remember that his HackMotion graph shows that he has 0-5 degrees of lead wrist flexion at impact - but note that the back of his lead hand and the watchface area of his lead lower forearm is facing more towards the ball-target line and it is not facing the target (as seen in those SC-demo capture images just above - see image 3). Note that his clubshaft and the lead lower forearm's lower radial bone are straight-line-aligned (which means that he has an intact LFFW alignment at impact).
So, what is happening in reality in Thorbjorn Olesen's "real life" driver golf swing action is totally opposite to what SC claims is happening.
Let's consider the address-impact alignments of other pro golfers who use the wrist option A pattern.
Keegan Bradley - image 1 is at address and image 2 is at impact.
Note that KB's lead humerus is internally rotated at address and that his lead forearm is pronated so that his lead lower forearm's lower radial bone is oriented about 45 degrees to the right (allowing him to adopt a moderately strong lead hand grip strength at address). Note that he optionally prefers to hold his clubshaft so that it is nearly perpendicular to the ball-target line at address with his lead hand further away from the target than the ball position, and that causes his lead wrist to become bent (which causes the clubshaft and lead forearm to not be straight-line-aligned).
Note that KB's lead humerus is still internally rotated at impact, and his lead forearm is still pronated to a degree that causes his lead lower forearm's lower radial bone to remain oriented about 45 degrees to the right. Note that he has a minimal amount of lead wrist flexion at impact and note that the back of his lead hand and the watchface area of his lead lower forearm is facing more towards the ball-target line and it is not facing the target (as seen in those SC-demo capture images just above - see image 3). Note that his clubshaft and the lead lower forearm's lower radial bone are straight-line-aligned (which means that he has an intact LFFW alignment at impact).
Both Thorbjorn Olesen and Keegan Bradley adopt a moderately strong lead hand grip at address, so let's consider two wrist option A pro golfers who adopt a weak lead hand grip strength at address.
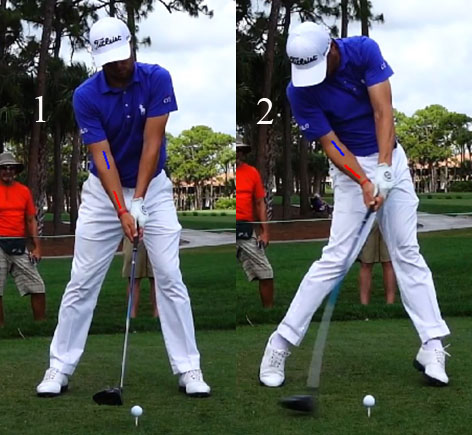
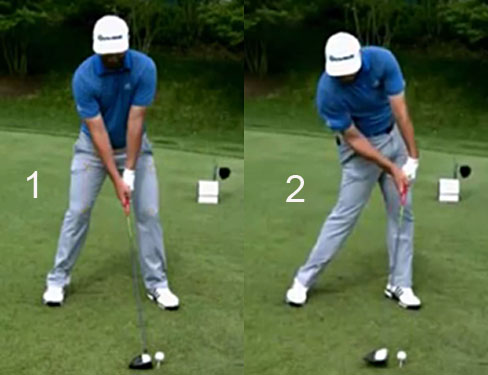
Justin Thomas - image 1 is at address and image 2 is at impact.
Note that KB's lead humerus is still internally rotated at impact, and his lead forearm is still pronated to a degree that causes his lead lower forearm's lower radial bone to remain oriented about 45 degrees to the right. Note that he has a minimal amount of lead wrist flexion at impact and note that the back of his lead hand and the watchface area of his lead lower forearm is facing more towards the ball-target line and it is not facing the target (as seen in those SC-demo capture images just above - see image 3). Note that his clubshaft and the lead lower forearm's lower radial bone are straight-line-aligned (which means that he has an intact LFFW alignment at impact).
Both Thorbjorn Olesen and Keegan Bradley adopt a moderately strong lead hand grip at address, so let's consider two wrist option A pro golfers who adopt a weak lead hand grip strength at address.
Justin Thomas - image 1 is at address and image 2 is at impact.
Note that you can see part of his lead antecubital fossa in image 1, which means that his lead humerus is not markedly internally rotated at address (as seen in a pro golfer - like Thorbjorn Olesen- who adopts a moderately strong lead hand grip strength at address).
Note that the back of JT's lead hand and the watchface area of his lead lower forearm face the target at address, which is not unexpected in a pro golfer who adopts a weak lead hand grip strength at address.
Note that JT's lead humerus is slightly more internally rotated at impact (image 2) compared to address (image 1), which means that it is rotating in the opposite direction predicted by SC.
Note that JT's lead wrist is minimally palmar flexed at impact. Note that the back of his lead hand and the watchface area of his lead lower forearm is rotated more clockwise at impact (compared to address), which means that it is rotating in the opposite direction predicted by SC. Note that his clubshaft is straight-line-aligned relative to his lead lower forearm's lower radial bone, which means that he has an intact LFFW alignment at impact.
Will Zalatoris - image 1 is at address and image 2 is at impact.
Note that you can see part of his lead antecubital fossa in image 1, which means that his lead humerus is not markedly internally rotated at address (as seen in a pro golfer - like Throbjorn Olesen- who adopts a moderately strong lead hand grip strength at address).
Note that the back of WZ's lead hand and the watchface area of his lead lower forearm face the target at address, which is not unexpected in a pro golfer who adopts a weak lead hand grip strength at address. Note that he has angled his clubshaft slightly forward at address because his hands are further away from the target than the ball position, which causes his lead wrist to become bent.
Note that WZ's lead humerus is slightly more internally rotated at impact (image 2) compared to address (image 1), which means that it is rotating in the opposite direction predicted by SC.
Note that WZ's lead wrist is minimally palmar flexed at impact, and that the back of his lead wrist/hand and the watchface area of his lead lower forearm has not rotated a lot counterclockwise as predicted by SC and that his lead lower forearm's lower radial bone is still oriented slightly to the right (as it was at address). Note that his clubshaft is straight-line-aligned relative to his lead lower forearm's lower radial bone, which means that he has an intact LFFW alignment at impact.
These 4 examples show that what is happening in the "real life" full golf swings of pro golfers, who use the wrist option A pattern, is totally opposite to what SC claims is happening.
Why does SC get it so wrong!
Look again at these SC-demo capture images.
SC seemingly has the mental idea that a pro golfer (who uses the wrist option A pattern) gets forward shaft lean at impact by thrusting the lead wrist forward into a bowed wrist alignment where the back of the bowed lead wrist faces the target and where the degree of forward shaft lean is directly proportional to the degree of lead wrist bowing. That forward bowed lead wrist technique is often used by pro golfers for chipping and short iron shots, but it is not routinely used for their full golf swing shots (eg. driver golf swing action).
I think that pro golfers, who manifest the HackMotion wrist option A pattern, are far more likely to be using the intact LFFW/GFLW swing technique for their full golf swing action - where the desired amount of forward shaft lean at impact is obtained by controlling the degree of lead forearm pronation that exists at impact. For a finite amount of forward shaft lean at impact, golfers who adopt a weak-or-neutral lead hand grip strength at address, will likely have to ensure that their lead forearm is more pronated at impact than it was at address. For the same finite amount of forward shaft lean at impact, golfers who adopt a moderately strong lead hand grip strength at address, will likely not have to ensure that their lead forearm is more pronated at impact than it was at address.
Look at the impact images of those 4 pro golfers (Thorbjorn Olesen, Keegand Bradley, Justin Thomas, Will Zalatoris) and you will note that they all have forward shaft lean at impact. However, they are not getting their desired amount of forward shaft lean at impact by thrusting a bowed lead wrist targetwards in such a manner that the back of their lead wrist, and the watchface area of their lead lower forearm, faces the target at impact. In fact, they have minimal lead wrist bowing and the back of their lead hand, and the watchface area of their lead lower forearm, is facing far more rightwards (away from the target) and it facing more towards the ball-target line at impact. To really understand how they get their desired amount of forward shaft lean at impact, you really need to understand the intact LFFW/GFLW swing technique, which is frequently used by pro golfers, who manifest the wrist option A pattern in their full golf swing actions.
Here is a link to my description of the intact LFFW/GFLW swing technique - perfectgolfswingreview.net/downswing.htm#topic6
It is too labor-intensive to repeat all the details of the intact LFFW/GFLW swing technique in this post, so I will only explain some of the most salient points.
The most important point that a golf instructor/golfer needs to understand is that a HackMotion device only measures lead wrist flexion/extension and it cannot differentiate between changes in those measurements that are either due to a lead wrist bending action (which will cause the lead wrist extension measurement to increase) or a lead wrist bowing action (which will cause the lead wrist flexion measurement to increase) from changes in the lead wrist extension/flexion measurements that are not due to lead wrist bending/bowing actions, but are solely due to changes in the degree of radial => ulnar deviation of the lead wrist.
So, consider this demonstration by me (author of this post).
Image 1 - I have placed a short piece of black tape over my lead lower forearm's lower radial bone. Then, I gripped the club handle using a weak lead hand grip strength pattern. Note that I am holding the club (small child's club) so that the clubshaft is straight-in-line with the black tape (= lead forearm) and that straight-in-line alignment between the clubshaft and the lead lower forearm represents an intact LFFW (left forearm flying wedge) alignment. If I bend, or bow, my lead wrist the clubshaft would angle backwards away from the target (if I bowed my lead wrist) or angle targetwards (if I bent my lead wrist) and that would cause my LFFW to be non-intact. Note that my lead wrist is neutral in the plane of radial => ulnar deviation, and that I appear to have a finite amount of dorsiflexion of the lead wrist (from an anatomical perspective), which would cause the HackMotion device to generate a finite lead wrist extension measurement value.
Image 2 - I am now maximally deviating my lead wrist in a radial direction while maintaining an intact LFFW alignment. Note that my lead wrist is much more dorsiflexed (from an anatomical perspective) and that will cause the HackMotion device to generate a larger lead wrist extension measurement value - even though my lead wrist is not bending and it is still a geometrically flat lead wrist (representing a GFLW = geometrically flat lead wrist) .
Image 3 - I am now maximally deviating my lead wrist in an ulnar direction while maintaining an intact LFFW/GFLW alignment. Note that my lead wrist appears to be minimally palmar flexed and it looks visually flattish. A HackMotion device would probably generate a lead wrist flexion value of 0 - 5 degrees - even though my lead wrist is not bowing and it is still a GFLW.
Now, consider how I perform a *simulated downswing action between P4 => P7.1 while continuously maintaining an intact LFFW/GFLW alignment throughout the entore downswing action.
(* simulated because the following capture images are static positions and not dynamic positions)
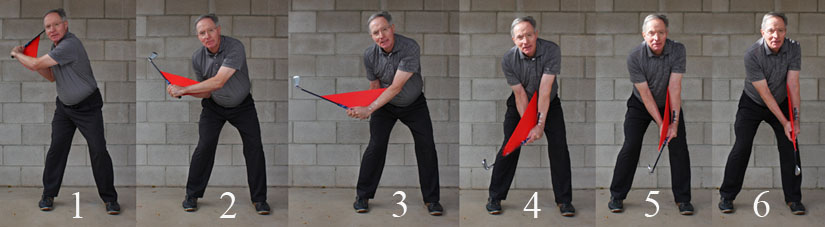
Note that I am trying to hold a piece of red cardboard against the ventral aspect of my lead lower forearm and against the back of the clubshaft (using my trail hand) so that it can visually represent an intact LFFW.
Image 1 is at a shortened P4 position, image 2 is at the ~P5.5 position, image 3 is at the ~P5.8 position, image 4 is at the P6.5 position, image 5 is at the P7 position where I manifest a finite amount of forward shaft lean, and image 6 is at P7.1.
Note that I am continuously maintaining an intact LFFW/GFLW alignment all the way between P4 => P7.1 and I am never allowing my lead wrist to either bend or bow at any time point during the entire downswing and immediate early followthrough time period between P4 => P7.1. Note that my lead wrist appears to be visually dorsiflexed between P4 => P6 (when my lead wrist is still radially deviated), but it then appears to become progressively more visually flat (or even slightly palmar flexed) at P6.5 and P7/P7.1 when my lead wrist becomes increasingly ulnar-deviated (due to the fact that I am releasing the club - representing the release of PA#2 in TGM terminology - in the plane of radial => ulnar deviation during my later downswing action between P6 => P7). Note that I am still maintaining an intact LFFW/GFLW alignment between P7 => P7.1 and that my lead wrist appears to be visually flattish (0 -5 degrees palmar flexed).
If I had a HackMotion device in place, what would my lead wrist extension/flexion graph pattern look like?
It would likely look nearly identical to this wrist option A pattern - see the green graph.
Note that the green graph shows a decreasing lead wrist extension value in the later downswing as the lead wrist becomes increasingly ulnar-deviated and note that the lead wrist flexion value is ~ 0 - 5 degrees between P7 => P7.1+.
Note that I have finite amount of forward shaft lean at impact even though my lead wrist is still geometrically flat and not bowed. How is that finite amount of forward shaft lean achieved if I am not bowing my lead wrist? It is simply due to the fact that my lead forearm is slightly pronated at impact, and not neutral - and that causes my intact LFFW to be angled back slightly in a clockwise direction.
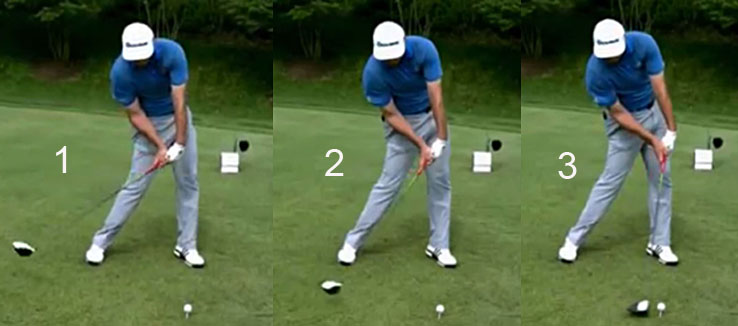
What I am demonstrating in this simulated downswing action is what is really happening in Justin Thomas' downswing action.
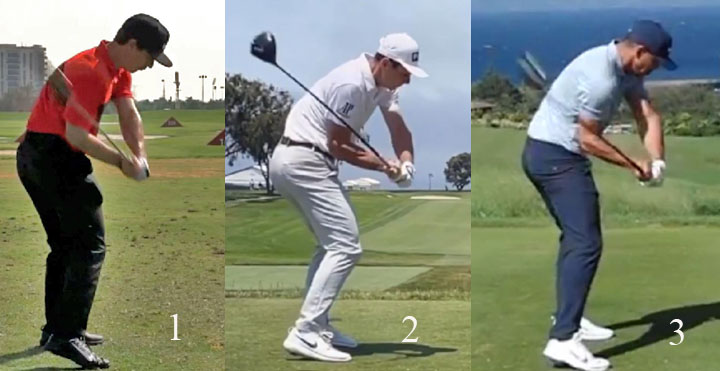
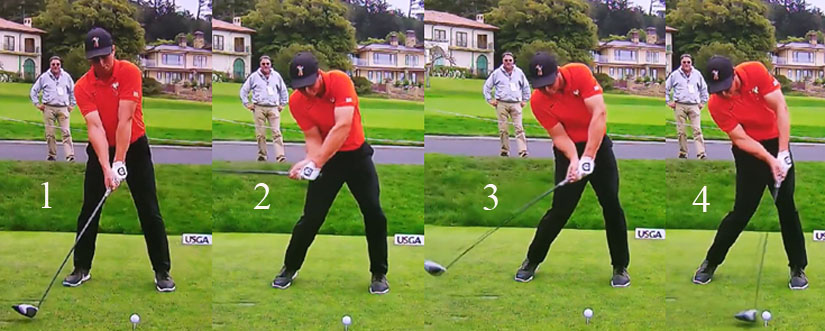
Capture images of Justin Thomas driver's late downswing action.
Note that I have finite amount of forward shaft lean at impact even though my lead wrist is still geometrically flat and not bowed. How is that finite amount of forward shaft lean achieved if I am not bowing my lead wrist? It is simply due to the fact that my lead forearm is slightly pronated at impact, and not neutral - and that causes my intact LFFW to be angled back slightly in a clockwise direction.
What I am demonstrating in this simulated downswing action is what is really happening in Justin Thomas' downswing action.
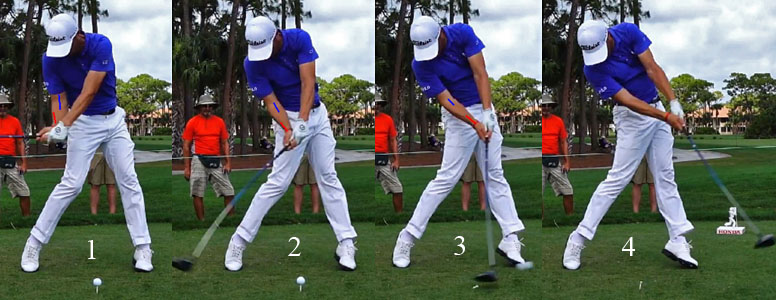
Capture images of Justin Thomas driver's late downswing action.
Image 1 is at P6, image 2 is at P6.5, image 3 is at P7 and image 4 is at P7.4.
Note that JT has an intact LFFW/GFLW alignment all the way between P6 => P7.4 and he never bends or bows his lead wrist between P6 => P7.4, which would disrupt his intact LFFW alignment.
Note that his lead wrist appears to be visually dorsiflexed to a small degree at P6, but less so at P6.5. Note that his lead wrist appears to be visually flat (minimally palmar flexed) at P7 and also at P7.4.
If JT had a HackMotion device in place during this driver swing action, it would generate a lead wrist extension/flexion graph that would likely look identical to that wrist option A green graph above.
Note that JT has a finite amount of forward shaft flex at impact, but it is not due to a lead wrist bowing action and it is achieved because his intact LFFW is still rotated clockwise to a small degree at impact due to the fact that his lead forearm is slightly pronated.
Note that JT has an intact LFFW alignment at P7.4, but he also has an intact LAFW (left arm flying wedge) alignment as well as an intact LFFW alignment. The intact LAFW alignment means that his clubshaft is straight-line-aligned with his lead humerus and not only the lead lower forearm (from an angular rotational perspective), and that requires a neutral lead forearm alignment (and not a pronated or a supinated lead forearm).
In my demonstration of the intact LFFW/GFLW swing technique, I adopted a weak lead hand grip. However, it is possible to also perform the same technique with a neutral or a moderately strong lead hand grip, and I suspect that the majority of pro golfers (eg. Tiger Woods, Rory McIlroy, Henrik Stenson, Justin Rose, Adam Scott, Justin Thomas, Keegan Bradley and Thorbjorn Olesen) are using the intact LFFW/GFLW swing technique if they are using the wrist option A pattern.
Now, let's analyse what SC has to say about the alignment of the lead humerus in pro golfers who use the wrist option B pattern.
Watch what SC is doing and saying between the 25:00 - 26:00 minute time point of his HackMotion video when he talks about Dustin Johnson's wrist option B pattern.
Note that he states that a wrist option B golfer starts with the lead humerus in a condition of external rotation at address. He then states that the golfer will adduct his lead arm across his chest to a marked degree during the backswing action, which causes the lead humerus to become interally rotated. He then states a wrist option B golfer will keep the lead humerus internally rotated throughout the entire downswing - by using a pelvic slide action combined with a tilt-and-turn upper torso pivot motion that characteristically avoids any pivot stalling in the later downswing - which will causally allow that golfer to reach impact with the lead humerus still internally rotated and with the lead forearm's lower radial bone facing 40 degrees to the right. He seemingly also infers that a wrist option B golfer does not use a PA#3 release action to square the clubface by impact and that he squares the clubface by impact by moving his bowed lead wrist rapidly towards becoming less flexed (towards extension) in the later downswing.
I will thoroughly dissect all of those claims, and I will start off by comparing a wrist option B golfer's lead humerus alignment at address and at impact.
In his HackMotion video, SC mentioned two other pro golfers who use the wrist option B pattern - Viktor Hovland and Brooks Koepka. So, let's look at their address and impact alignments.
Capture images of Viktor Hovland at address (image1) and at impact (image 2).
Note that VH's lead humerus is internally rotated at address and also at impact.
Capture images of Brooks Koepka at address (image 1) and at impact (image 2).
Capture images of Brooks Koepka at address (image 1) and at impact (image 2).
Note that BK's lead humerus is internally rotated at address and also at impact.
So, these two sets of capture images contradict SC's claim that wrist option B golfers have their lead humerus externally rotated at address.
It is my personal opinion that if a golfer chooses to adopt a moderately strong lead hand grip at address, that he is more likely to have his lead humerus internally rotated at address - irrespective of whether he is a wrist option A golfer (like Thorbjorn Olesen and Keegan Bradley) or a wrist option B golfer (like Viktor Hovland or Brooks Koepka). I think that Dustin Johnson is simply an outlier, who adopts a moderately strong lead hand grip strength at address with his lead humerus externally rotated (possibly due to the fact that he likely has a hyper-flexibility syndrome that makes these alignments easily achievable). It is also not surprising that a pro golfer, who adopts a moderately strong lead hand grip at address where the lead forearm is pronated to such a degree that the lead lower forearm's radial bone is angled about 45 degrees to the right at address, will have that same ~45 degree angled-right alignment of the lead lower forearm's lower radial bone at impact - irrespective of whether they are a wrist option A golfer (like Thorbjorn Olesen or Keegan Bradley) or a wrist option B golfer (like Viktor Hovland and Brooks Koepka). Note that bowing of the lead wrist in wrist option B golfers does not change their 45 degree angle of the lead lower forearm's lower radial bone at impact because their bowed lead wrist is facing the ball-target line at impact - and it does not significantly affect the degree of forward shaft lean at impact, thereby requiring a compensatory biomechanical action.
Now, let's consider the alignment of the lead humerus at address and at impact in wrist option B golfers who adopt a weak lead hand grip strength at address.
Capture images of Collin Morikawa at address (image 1) and at impact (image 2).
Note that CM has adopted a weak lead hand grip at address. Therefore, it is not surprising that one can partly see his lead antecubital fossa (see short red line) at address because his lead humerus is not internally rotated to a significant degree. Note that his lead forearm's lower radial bone (see short blue line) is not angled 45 degrees to the right.
Note that CM's lead humerus is more internally rotated at impact, but note that his lead lower forearm's lower radial bone (see short blue line) is angled even more counterclockwise at impact (compared to address) so that it is roughly angled 100 degrees to the left (10 degrees closed if 90 degrees is regarded as being neutral between open => closed) relative to the ball-target line at impact, and it is not angled-right by 45 degrees at impact.
Capture images of Jon Rahm at address (image 1) and at impact (image 2).
Close-up capture images of Jon Rahm at address (image 1) and at impact (image 2)
Note that JR has adopted a weak lead hand grip strength at address. Therefore, it is not surprising that one can partly see his lead antecubital fossa at address because his lead humerus is not internally rotated to a significant degree. Note that his lead forearm's lower radial bone is not angled 45 degrees to the right.
Note that JR's lead humerus is internally rotated more at impact, but note that his lead lower forearm's lower radial bone is angled even more counterclockwise at impact (compared to address) so that it is about 110 degrees angled-left relative to the ball-target line at impact, and it is not angled-right by 45 degrees at impact.
How does one explain why Collin Morikawa and Jon Rahm have their lead lower forearm's lower radial bone rotated more counterclockwise at impact (compared to their address position) when Viktor Hovland and Brooks Koepka do not manifest that biomechanical feature?
Here is my answer-: Note that Viktor Hovland and Brooks Koepka only have a small degree of lead wrist bowing at impact and note that the back of their bowed lead wrist is facing more towards the ball-target line (and not the target) at impact. That means that their lead wrist bowing phenomenon will not angle their clubshaft away from the target to a large degree and they therefore do not have to roll their lead forearm's lower radial bone more counterclockwise at impact as a compensatory move in order to get their desired amount of forward shaft lean at impact. By contrast, both Collin Morikawa and Jon Rahm reach impact with a markedly bowed lead wrist and where the back of their bowed lead wrist faces the target at impact. That exaggerated degree of lead wrist bowing would result in an excessive degree of forward shaft lean at impact without a compensatory biomechanical move and they prevent that fact from happening by controllably rolling their lead lower forearm's lower radial bone counterclockwise in a more supinatory direction, which rotates their clubshaft in a counterclockwise direction thereby decreasing the amount of forward clubshaft lean that they actually manifest at impact to become equal to their desired amount.
It is my opinion that SC does not take into full account the major effect of lead wrist grip strength on arm/forearm alignments at impact - irrespective of whether the golfer uses wrist option A or wrist option B.
The next issue that I will discuss is the way that a pro golfer willl get the lead arm in front of the body during the P4 => P5.5 time period when he lowers his hands down to waist level, and SC opines on this topic between the 11:10 - 12:41 minute time point of his HackMotion video. SC states that a wrist option A golfer will keep his forward chest flex thereby creating more space for the descent of the lead arm. By contrast, SC opines that a wrist option B golfer's upper torso will be more closed at the P5 position and that he will get the lead arm downwards to the waist level position by tilting his body and sliding his lead arm more downwards across the front of the body and where the lead arm remains adducted for longer, thereby allowing the lead humerus to remain internally rotated.
I believe that SC's opinions are inconsistent with reality.
Here are DTL comparisons images of Thorbjorn Olesen (image 1), Viktor Hovland (image 2) and Brooks Koepka (image 3) at their P5.5 position.
Note that all three of those pro golfers have maintained their spinal bend inclination angle and they are all getting their hands down to waist level in the same manner by performing an active trail upper arm adduction maneuver combined with a pitch elbow motion of their trail elbow. Note that they are all moving their lead arm away from the front of their torso in the plane of adduction => abduction and there is no evidence that VH and BK are keeping their lead upper arm more adducted against the front of the upper torso while they slide their pelvis targetwards and acquire a greater degree of side tilt of the upper torso.
Consider Viktor Hovland's early downswing action from a face-on perspective.
Consider Viktor Hovland's early downswing action from a face-on perspective.
Image 1 is at his P4 position, image 2 is at his P4.5 position and image 3 is at his P5.2 position.
I have drawn red lines alongside the outer border of his pelvis at his P4 position.
Note that VH does not slide his pelvis targetwards during his early downswing between P4 => P5.2 while he squares his pelvis, and he is not acquiring a greater degree of rightwards tilt of his upper body. Note that he has successfully lowered his trail arm from a 12 o'clock position at P4 to a near-horizontal position at P5.2 by fully adducting his trail upper arm against the side of his trail mid-upper torso and his hands are moving down towards waist level well in front of his rotating upper torso in the standard manner, where the lead upper arm abducts away from the front of the rotating upper torso that continuously maintains its forward flex due to the maintenance of a constant spinal bend inclination angle - and I think that this standard PA#4 unloading pattern is characteristic of many wrist option A and B golfers.
Capture images of Dustin Johnsons's early-mid downswing action.
Image 1 is at his P4 position, image 2 is at his P5 position and image 3 is at his P5.5 position.
The red splined path is his hand arc path.
Note that DJ actually increases his degree of forward chest flexion during the hip squaring phase that happens between P4 => P5 and he has not acquired any increased degree of trail side bend by his P5 position.
Note how DJ abducts his lead arm away from the front of his upper torso as he continues to lower his hands down to waist level between P5 => P5.5. If you follow the direction of his hands down his hand arc path from P4 => P5.5 one can clearly see that he is lowering his hands down to waist level in the standard manner while he is simultaneously rotating his pelvis and upper torso counterclockwise.
I think that there is no evidence to suggest that wrist option B golfers perform their hands-lowering action between P4 => P5.5 in a significantly different way than wrist option A golfers.
Now, I will discuss the very controversial issue of how a golfer squares the clubface by impact and I will discuss whether there are significant differences between wrist option A and wrist option B golfers.
When I talk about the "clubface squaring" issue I am only referring to the clubface becoming more square to the clubhead path during the downswing action. I am not referring to changes in the clubhead path that may have a clubface squaring action relative to the ball-target line. So, for example, if a human being was capable of keeping the clubface square to his clubhead path all the way between P1 => P4 then there would be no need to talk about the issue of the clubface becoming more square relative to the clubhead path during the downswing. If the clubface is square to the clubhead path at P4, then a golfer only needs to time his clubhead motion during his downswing action so that his clubhead becomes square to the ball-target line at impact, and there would be no need to discuss the issue of the clubface rolling more closed relative to the clubhead path path during the downswing action.
The reason why we have to discuss the "clubface squaring" issue is due to the fact that ALL pro golfers pronate their lead forearm to a variable degree between P1 => P4, which opens the clubface relative to the clubhead path; and they therefore ALL have to reverse this process during their downswing in order to get the clubface square to the clubhead path by impact if they want to zero-out their clubhead path and clubface angle at impact. The amount of clubface closing relative to the clubhead path required during the downswing is inversely prorportional to lead hand grip strength - because golfers who adopt a stronger lead hand grip have their lead forearm much more pronated at address, and they therefore have to add less lead forearm pronation during the P1 => P4 time period. That means that they need to perform a lesser amount of lead forearm supinatory motion during their P4 => P7 time period in order to get a clubface that is square to the clubhead path by impact.
The question then becomes-: For a given degree of lead hand grip strength, do wrist option B golfers have to use less lead forearm supination (which is called a PA#3 release action in TGM terminology) during their later downswing than wrist option A golfers.
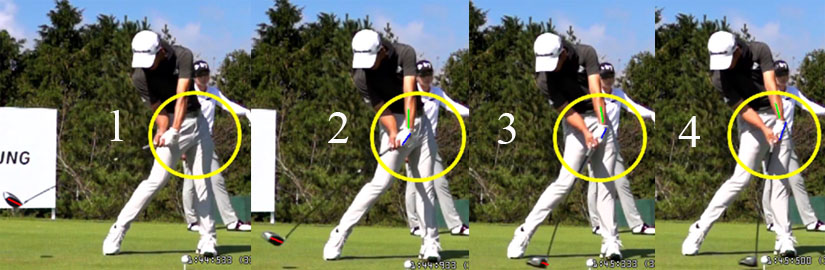
Let's start off by analysing the clubface closing action of the wrist option B pro golfer Jon Rahm.
Here are capture images of Jon Rahm performing his PA#3 release action in his later downswing between P6 => P7.
The red splined path is his hand arc path.
Note that DJ actually increases his degree of forward chest flexion during the hip squaring phase that happens between P4 => P5 and he has not acquired any increased degree of trail side bend by his P5 position.
Note how DJ abducts his lead arm away from the front of his upper torso as he continues to lower his hands down to waist level between P5 => P5.5. If you follow the direction of his hands down his hand arc path from P4 => P5.5 one can clearly see that he is lowering his hands down to waist level in the standard manner while he is simultaneously rotating his pelvis and upper torso counterclockwise.
I think that there is no evidence to suggest that wrist option B golfers perform their hands-lowering action between P4 => P5.5 in a significantly different way than wrist option A golfers.
Now, I will discuss the very controversial issue of how a golfer squares the clubface by impact and I will discuss whether there are significant differences between wrist option A and wrist option B golfers.
When I talk about the "clubface squaring" issue I am only referring to the clubface becoming more square to the clubhead path during the downswing action. I am not referring to changes in the clubhead path that may have a clubface squaring action relative to the ball-target line. So, for example, if a human being was capable of keeping the clubface square to his clubhead path all the way between P1 => P4 then there would be no need to talk about the issue of the clubface becoming more square relative to the clubhead path during the downswing. If the clubface is square to the clubhead path at P4, then a golfer only needs to time his clubhead motion during his downswing action so that his clubhead becomes square to the ball-target line at impact, and there would be no need to discuss the issue of the clubface rolling more closed relative to the clubhead path path during the downswing action.
The reason why we have to discuss the "clubface squaring" issue is due to the fact that ALL pro golfers pronate their lead forearm to a variable degree between P1 => P4, which opens the clubface relative to the clubhead path; and they therefore ALL have to reverse this process during their downswing in order to get the clubface square to the clubhead path by impact if they want to zero-out their clubhead path and clubface angle at impact. The amount of clubface closing relative to the clubhead path required during the downswing is inversely prorportional to lead hand grip strength - because golfers who adopt a stronger lead hand grip have their lead forearm much more pronated at address, and they therefore have to add less lead forearm pronation during the P1 => P4 time period. That means that they need to perform a lesser amount of lead forearm supinatory motion during their P4 => P7 time period in order to get a clubface that is square to the clubhead path by impact.
The question then becomes-: For a given degree of lead hand grip strength, do wrist option B golfers have to use less lead forearm supination (which is called a PA#3 release action in TGM terminology) during their later downswing than wrist option A golfers.
Let's start off by analysing the clubface closing action of the wrist option B pro golfer Jon Rahm.
Here are capture images of Jon Rahm performing his PA#3 release action in his later downswing between P6 => P7.
Image 1 is at his P6.5 position where his clubface is open relative to his clubhead path. Image 2 is at his P6.75 position where the clubface is less open to his clubhead path. Image 3 is at impact where his clubface is square to his clubhead path.
So, how did JR close his clubface more relative to his clubhead path between P6.5 => P7 in order to get a square clubface at impact?
Look at JR's lead forearm's lower radial bone and note that it is angled well to the right at P6.5 being about 60 degrees open relative to the ball-target line and it then rotates counterclockwise to be angled about 100 degrees (10 degrees closed if 90 degrees is regarded as being neutral) relative to the ball-target line at impact. Note that there has been very little change in his degree of internal rotation of his lead humerus between P6.5 => P7 so most of the counterclockwise rotation of the lead lower forearm's lower radial bone is due to lead forearm supination. I believe that JR's lead forearm supinatory motion is the primary factor causally responsible for squaring his clubface relative to his clubhead path by impact. Note that there has been no change in his degree of lead wrist bowing between P6.5 => P7 and it is therefore irrational to believe that a lead wrist extending action is causally responsible for squaring his clubface by impact.
Here are capture images of another wrist option B golfer - Colllin Morikawa.
Image 1 is at P6.2, image 2 is at P6.5, image 3 is at P6.8 and image 4 is at impact.
Look at his lead lower forearm's lower radial bone in image 1 - it is angled about 90 degrees open relative to the ball-target line. Note that it then rotates counterclockwise to become angled about 110 degrees to the left (20 degrees closed if 90 degrees is regarded as being neutral) relative to the ball-target line at impact. Note that there has been very little change in his degree of internal rotation of his lead humerus between P6.5 => P7 so most of the counterclockwise rotation of his lead lower forearm's lower radial bone is due to lead forearm supination. Note that there has been no change in his degree of lead wrist bowing between P6.5 => P7 and it is therefore irrational to believe that a lead wrist extending action is causally responsible for squaring his clubface by impact.
For comparison, consider the clubface squaring action of a wrist option A golfer who also adopts an equally weak lead hand grip strength at address - Justin Thomas.
Image 1 is at his P6 position, image 2 is at his P6.5 position and image 3 is at his impact position.
Note that JT's lead lower forearm's lower radial bone is ~90 degrees open relative to the ball-target line at P6, ~60 degrees open relative to the ball-target line at P6.5 and ~10 degrees open relative to the ball-target line at impact. Note that his lead humerus has rotated counterclockwise a small amount between P6 => P7 and it can be casually responsible for causing the lead lower forearm's lower radial bone to rotate counterclockwise between P6 => P7 with lead forearm supination being responsible for the rest of the total amount. Note that there has been no change in his degree of lead wrist bowing between P6.5 => P7 and it is therefore irrational to believe that a lead wrist extending action is causally responsible for squaring his clubface by impact.
It should be patently obvious from these comparisons that if a pro golfer adopts a weak lead hand grip strength at address, that using the wrist option B pattern will result in a greater amount of counterclockwise rotation of the lead lower forearm's lower radial bone between P6 => P7 - compared to a pro golfer who adopts an equally weak lead hand grip strength at address, but who uses the wrist option A pattern. That is exactly opposite to SC's prediction. Also, SC claims that the counterclockwise rotation of the lead humerus/lead forearm between P6 => P7 is due to a pivot motion stalling action. That unscientific claim supposedly implies that Jon Rahm and Collin Morikawa (who use the wrist option B pattern) must be stalling their pivot motion more than Justin Thomas and Will Zalatoris (who use the wrist option A pattern) according to SC's manner of reasoning. I personally believe that neither of those 4 pro golfers stall their pivot motion in their later downswing, and I think that there is no logical reason to postulate that a pivot motion stalling action is ever required to rotate the lead humerus/forearm counterclockwise between P6 => P7 in a pro golfer's late downswing action.
Now, let's consider if there are differences in the PA#3 release pattern in pro golfers who adopt a moderately strong (3-4 knuckle) lead hand grip strength at address depending on which wrist option pattern they choose to use in their full golf swing action.
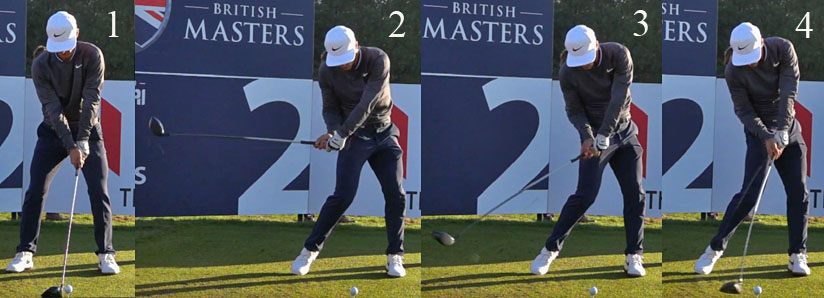
Here is a swing video of Thorbjorn Olesen's driver swing action.
Note that JT's lead lower forearm's lower radial bone is ~90 degrees open relative to the ball-target line at P6, ~60 degrees open relative to the ball-target line at P6.5 and ~10 degrees open relative to the ball-target line at impact. Note that his lead humerus has rotated counterclockwise a small amount between P6 => P7 and it can be casually responsible for causing the lead lower forearm's lower radial bone to rotate counterclockwise between P6 => P7 with lead forearm supination being responsible for the rest of the total amount. Note that there has been no change in his degree of lead wrist bowing between P6.5 => P7 and it is therefore irrational to believe that a lead wrist extending action is causally responsible for squaring his clubface by impact.
It should be patently obvious from these comparisons that if a pro golfer adopts a weak lead hand grip strength at address, that using the wrist option B pattern will result in a greater amount of counterclockwise rotation of the lead lower forearm's lower radial bone between P6 => P7 - compared to a pro golfer who adopts an equally weak lead hand grip strength at address, but who uses the wrist option A pattern. That is exactly opposite to SC's prediction. Also, SC claims that the counterclockwise rotation of the lead humerus/lead forearm between P6 => P7 is due to a pivot motion stalling action. That unscientific claim supposedly implies that Jon Rahm and Collin Morikawa (who use the wrist option B pattern) must be stalling their pivot motion more than Justin Thomas and Will Zalatoris (who use the wrist option A pattern) according to SC's manner of reasoning. I personally believe that neither of those 4 pro golfers stall their pivot motion in their later downswing, and I think that there is no logical reason to postulate that a pivot motion stalling action is ever required to rotate the lead humerus/forearm counterclockwise between P6 => P7 in a pro golfer's late downswing action.
Now, let's consider if there are differences in the PA#3 release pattern in pro golfers who adopt a moderately strong (3-4 knuckle) lead hand grip strength at address depending on which wrist option pattern they choose to use in their full golf swing action.
Here is a swing video of Thorbjorn Olesen's driver swing action.
Here are capture images from that video.
Image 1 is at address, image 2 is at his P6 position, image 3 is at his P6.5 position and image 4 is at impact.
Note that TO has adopted a strong lead hand grip strength at address so that his lead lower forearm's lower radial bone is angled about 45 degrees to the right. Note that his clubface is facing the target and that it is ~45 degrees closed relative to the back of his lead wrist.
Note that his lead lower forearm's lower radial bone is ~90 degrees open relative to the ball-target line at P6, ~60 degrees open relative to the ball-target line at P6.5 and ~45 degrees open relative to the ball-target line at impact. Note that his 45 degrees open alignment of his lead lower forearm's lower radial bone at impact allows him to automatically/naturally get his desired amount of forward shaft lean at impact and it also allows him to get his clubface square at impact. TO is using very little lead forearm supination during his PA#3 release action that is happening between P6.5 => P7 in order to get his clubface square relative to his clubhead path at impact.
Note that TO's lead wrist is borderline palmar flexed at P6.5 and P7, but it is not due to a lead wrist bowing action that moves the clubshaft out of angular rotational alignment relative to his lead lower forearm's lower radial bone, and it is due to his lead wrist becoming more ulnar-deviated while he maintains an intact LFFW alignment.
Now, let's compare a wrist option B golfer's PA#3 release action to TO's PA#3 release action.
Capture images of Viktor Hovland's PA#3 release action.
Image 1 is at P1.5 (because this swing video did not start at his P1 position), image 2 is at his P6 position, image 3 is at his P6.5 position and image 4 is at impact.
Note that VH has adopted a strong lead hand grip strength at address so that his lead lower forearm's lower radial bone is angled about 45 degrees to the right. Note that his clubface is presumably facing the target at address (P1) and that it is ~45 degrees closed relative to the back of his lead wrist.
Note that VH's lead lower forearm's lower radial bone is ~90 degrees open relative to the ball-target line at P6, ~60 degrees open relative to the ball-target line at P6.5 and ~45 degrees open relative to the ball-target line at impact. Note that his 45 degrees open alignment of his lead lower forearm's lower radial bone at impact allows him to automatically/naturally get his desired amount of forward shaft lean at impact and it also allows him to get his clubface square at impact. VH is using very little lead forearm supination during his PA#3 release action that is happening between P6.5 => P7 in order to get his clubface square relative to his clubhead path at impact - and the amount required is seemingly no different to Thorbjorn Olesen's required amount.
Note that VH's lead wrist is not moving significantly in the direction of increasing lead wrist extension between P6 => P7 and there is no reason to believe that a lead wrist extending phenomenon is contributing to his ability to square his clubface by impact.
The true "real life" reality is that if a pro golfer adopts a strong lead hand grip strength at address (like Thorbjorn Olesen and Viktor Hovland) that they are going to need to use very little lead forearm supination during their PA#3 release action in order to get a square clubface by impact, and that using the wrist option B pattern does not cause a significant difference in the degree of lead forearm supination required.
If a wrist option B golfer allowed his bowed lead wrist to become less bowed between P6.5 => P7 (like Dustin Johnson) it would have very little effect on the amount of lead forearm supination required during the PA#3 release action in order to get the clubface square to the clubhead path by impact. It would mainly affect the direction of the clubshaft motion between P6.5 => P7 and change the degree of angulation of the clubshaft relative to the lead arm.
Here are capture images of Dustin Johnson's PA#3 release action.
Image 1 is at address, image 2 is at P6.5, image 3 is at P6.8 and image 4 is at impact.
Note that DJ's lead lower forearm's lower radial bone is angled ~45 degrees to the right at address because he adopts a strong lead hand grip strength at address. Note that his clubface is therefore ~45 degrees closed relative to the back of his lead wrist/hand at address.
Note that DJ's lead wrist is overtly bowed at P6.5 and that causes his clubshaft to be angled back and inwards (towards his body) relative to his lead arm. Note that his degree of clubshaft angling relative to his lead arm becomes less between P6.5 => impact due to his lead wrist's ~20 degrees extending phenomenon happening between P6.5 => P7 and that allows him to get his desired amount of forward shaft lean at impact if he simultaneously ensures that his lead lower forearm's lower radial bone (which is angled ~60 degrees open at P6.5) becomes ~45 degrees open angled to the right at impact (like it was at address) by simultaneously controlling his degree of lead forearm supination happening between P6.5 => P7. Note that the clubhead path of DJs clubhead moves progressively less in-to-out between P6.5 => P7 as his clubshaft angulation with respect to his lead arm becomes progressively less as he gets progressively closer to impact.
I think that Dustin Johnson is mainly using a PA#3 release action (which is primarily due to lead forearm supination) to square his clubface relative to his clubhead path by impact, and that he needs to use very little lead forearm supination (and roughly similar in amount to the amount that Thorbjron Olesen and Viktor Hovland use during their PA#3 release action) because he adopted an equally strong lead hand grip strength at address. The fact that his bowed lead wrist is moving from being very bowed at P6.5 to becoming slightly less bowed at P7 does not significantly change the small amount of PA#3 release action required to square his clubhead path by impact and it mainly changes the angle of his clubshaft relative to his lead arm during his PA#3 release action time period. To get his exactly desired amount of forward shaft lean at impact, DJ has to have the correct balance of the degree of angulation of the clubshaft relative to his lead arm (due to a retained degree of lead wrist flexion) combined with the optimum amount of lead forearm supination that rotates the clubshaft in a counterclockwise direction, which counteracts the effect of a bowed lead wrist angling the clubshaft backwards away from the target in a clockwise direction.
As I reach the conclusion of this lengthy post, where I have expressed the opinion that many of SC's claims are unscientific and irrational, I would like to mention one claim that SC expressed in his HackMotion video that I think wins the prize for the most unscientific and most irrational claim. Listen to SC's video between the 23:23 - 23:40 minute time point of the video when he refers to the wrist option A pattern as a pull-push pattern where the pivot is going to stall and where pivot stalling in the later downswing will convert the pull pattern into a push pattern where the trail side of the body/trail arm becomes responsible for executing a push pattern. SC did not elborate on how the trail side of the body and the trail arm would perform a push pattern, but I find it incomprehensible to imagine that pro golfers who use the wrist option A pattern (eg, Tiger Woods, Justin Thomas, Will Chamberlain, Adam Scott, Justin Rose) are deliberately stalling their pivot motion in the mid-late downswing in order to allow the trail side of the body and trail arm to push the club onwards towards impact. I would very much like to see SC expand on his pull-push theory so that I can better understand his personal perspective.
Jeff.